


Call me a cheap-scape or thrifty but I would rather spend my money on fabric not all the accessories.
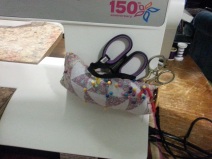 Pin cushion. Attach a pincushion around the throat of your machine. It’s always there does not fall off and pins are easy to put on or off. I sewed a tube and stuffed it with batting, attach the 2 strings on once side and a wide elastic on the other side. Then I sewed a button-hole in the elastic to tie around the throat. I am also able to tuck some snipping scissors behind easy to find too..

Quilting Gloves. Use fabric rubber palmed gardening gloves to do your quilting. It gives good grip without paying the high price of the “Quilting Gloves”. I also cut off the tip of the thumbs and index fingers then I can pick things up and rethread needles without having to remove my gloves.

Pounce was replaced with a glad container, a piece of plastic (Binder sleeves) with holes punched and flour. I use an old makeup blush brush to apply.
 Template Plastic. This I discovered at our local Elementary school. Turns out that they toss out the extra laminated paper that has gone thru the laminar. I use this for templates and also for drawing my quilting designs onto then stitch the pattern with no thread. I’ll lay this on top of where i want my pattern and use my pounce to transfer. This can be used over and over.

Design Wall. Pick up those flannel backed camping table cloths and pin them to the wall. The fabric sticks to this like velcro and you can rearrange your pieces over and over. When it gets too full of threads its real cheap to replace.
Extension Table. I made this with a piece of counter top from the inside of my sink when I redid my kitchen. I measured my sewing machine throat and made a template then jig sawed the marked piece to alow it to slide into position. Sanded all the edges for smoothness so that the fabric didn’t catch. For the legs I used appliance glides and a dowel screwed into the table. The furniture slides have threads so that the table can be adjusted up and down to the height needed.


Speciality Rulers. I’m able to figure what degree angles need to be to do different blocks. using a dry erase marker to mark those lines on the basic ruler saves me having to purchase all those special rulers that keep coming out. I put scotch tape on the lines so it would last longer. I also found a drafting protractor that I use quite often I can get any angle with this ruller.


If you have any tips that you’d like to share I’d love to hear about them.

Good tips, Renee! You are resourceful 🙂
LikeLiked by 1 person
thanks ann.
LikeLike
Thanks for sharing these are tips I can use. I am interested in the table you designed and since I am a tactile learner I need to touch the table to learn how you built it. Keep posting.
LikeLike
carol feel free to come over for coffee and I can show you or one day when we have guild sewing I can bring it.
LikeLike
I thought i was the only one who hated spending my money on accessories instead of fabric !
LikeLiked by 1 person
lol I’m pretty cheap sometimes its good to share tips and hints.
LikeLike
Renee, Ann told me you are now on the net and I am so pleased for you. I’ve had a good visit to see your presentations and I must tell you that since I’ve watched your progress over many years, just one word comes to mind and that’s AWESOME! Keep up the good work, Sue.
LikeLike
Thanks Sue. you taught me a lot over those many years. lol and I’m sure I will never know everything and as much as you can offer us.
LikeLike
Really useful tips that every quilter can use! Thank you for sharing!
LikeLiked by 1 person