


One day I was scrolling thru things to make for my grandson for Christmas. I came across this cute sock horse that was make just like a sock monkey. Now that Christmas is almost upon us I figured I’d make it. Do you think I could find directions anywhere… NOT and I looked and looked. So I figure I’d wing it and make one and record my progress as I make it so others could make one too.
Materials you’ll need: 
Wool socks or any kind
Batting,
Yarn, I used 3 colors black gray and red
buttons for eyes and nostrils(I used fabric paint as it’s for a small child and I don’t want them choking on the buttons.)
Assembly:
The 1st thing that I did was I turned one sock inside out so that when I sewed the legs the seams will be inside and not visible. Fold the sock so that the heel is centered.
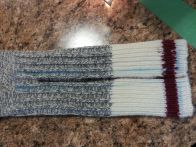 Draw a dark center line to about 2 inches from the heel color on the calf piece. Then draw a lighter line around the center line and at the cuff of the sock 1/4″ on each side all the way up to 1 inch from the heel. Sew on this line but only even with the dark line. This leaves you room to turn over the sock.
Cut the center line all the way up to the 1″ cross mark. trim corners at bottom of feet. Reverse the sock and stuff the legs and body. and sew the crotch opening shut with matching thread.


Using the 2nd sock. Cut across about 1/2″ under the heel. Make the front legs by drawing a center line and sewing 1/4″ from the cuff and line all the way up to the heel. Reverse and stuff. Tuck in the frayed edges.


The Nuzzel is made from the toe of the 2nd sock. I cut at an angle so that the top is longer then the bottom of the nose. Stuff the nose and sew using a whip stitch to attach the nose just under the nose piece of the 1st sock.


For the ears I sewed the heel of the 2nd sock. Cut 1/4″ on each side of the heel and separate so that you have 2 pieced also make 2 more pieces like this from the leftover of sock 2. place right sides together and sew the curved and one side of the ears pieces. Flip tuck in the frayed edges and sew this to the top of the horse body where the heel of the 1st sock is using a whip stitch. I used the colored of the inside of the ears.


Attatch the arms to the body using a whip stitch.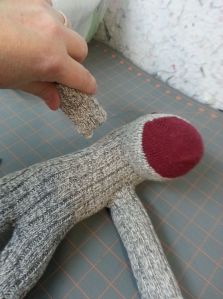
Maine and tail were made by wrapping 3 colors of yarn around a piece of cardboard. I wrapped it around 5 times. Cut the yarn off of the cardboard and tied a knot in the center. I then sewed the knot to the back of the head for the mane I used a total of 5 pieces and one to the butt piece( the heel of the 1st sock) for the tail.


At this point you can sew on buttons for the eyes and nostrils. But since this is going for my grandson I choose to use fabric paint to draw on the eyes, nostrils and mouth. Safer and reduces the choking hazard. 
I also chose to make a bandana for the pony just to dress him up a bit. Here is my finished pony. This one is for Grandson.


2nd one that I made.


3rd on made.. now I need to get more socks for hubby as the 1st was for grandson and the extra socks were for DH stocking. lol


Cool, I’d love to see more
LikeLike
see more what?
LikeLike
Great find here on your site. Been looking for a sock horse for my newest great-granddaughter.
LikeLike
glad you found it.. I’m sure she will enjoy it.
LikeLike
Going to try your horse for my granddaughter she loves horses
LikeLike
how did it turn out?
LikeLike
Going to try your horse for my granddaughter she loves horses
LikeLike
brilliant, I found it on pinterest. I’m going to try it and send it to my niece in england.
LikeLike
thats awsome.. have fun making it.
LikeLike