
For those of you who don’t know what a fidget quilt is. Its a sensory quilt made from different textures and colors and activities for touching and visual stimulation.
Over the Christmas holiday our family took a trip back to Saskatchewan to visit family. One of the stops was to my Aunty Ray and Uncle Dons. They now live in a senior home. During our visit i noticed that aunty was playing with the tab on my cell phone… she was constantly fiddling with whatever was on hand. She has dementia, I had heard about fidget quilts so on our drive home i started googling fidget quilts and saving those that i liked in my Pinterest for easy fiddling later. On the 29th I picked up mom and that evening after our christmas supper we started on a fidget quilt for aunty. We worked on it about 3 hrs that evening and 4 hrs the next morning the 30th, we got all the blocks done. I finished it on the 31st. I sewed the blocks together about 2 hours and on the 1st added the borders and quitted it and other 3 hrs. 12 Hours later i had a finished fidget quilt.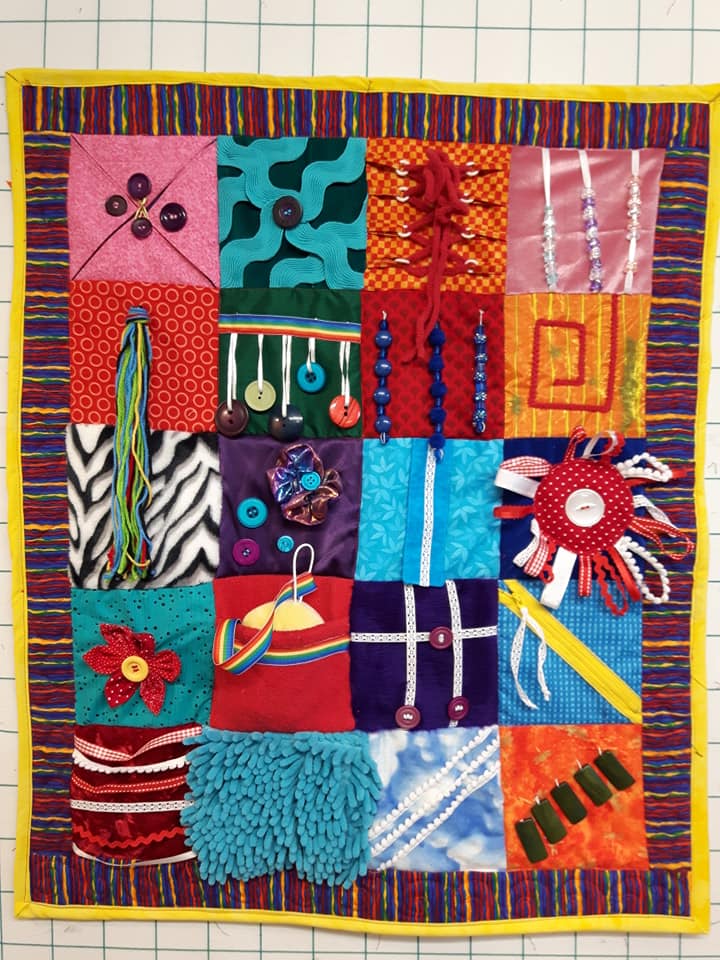
Fist thing I had to do was hunt for different textured fabrics. I found some cotton of course with bright designs, flannel, velour, silk, satin, velvet, minky, fireside, and crinoline. I cut these to 6″ blocks. Red and Blue are auntys favorite colors so i made sure i had quite a few of each.
Next was to find things to put on these blocks. Buttons, Yarn, hair scrunchies, velcro, zipper, beads, ribbon, anything that would give texture to the activities.
Now mom and I started building the blocks by adding activities to them. Ill describe each block in order.
Block 1: This was made by cutting Four 6″ squares and folding them into 4ths on the diagonal and sewing them on top of the purple dotted cotton. One tab has a buttonhole, one has velcro one i sewed across to make it shorter flap and added buttons to 2 and a string to the last to wind around to close the 2 flaps like those large envelopes that are used in business with the string closure. Next time i’ll add in a picture to give it that peek a boo feature.


Block 2: Is made up with large rick rack, I started with diagonal pieces then wove 2 more and added a button in the center to hold only that part down the rest is left loose except for the edges that was sewn to the block of green velvet
Block 3: I made using 8 tabs that I made from 1 inch stirp and folder like byas tape and folded in half. I added plastic rings so we could lace the yarn. then sewed the tabs to the edges on each side. next was to sew the bottom of the string I used a soft yarn and then laced it into place. If i can find a soft shoe lace id use that next time.


Block 4: Here I used a velour fabric and white ribbon strung some beads and sewed them to the edges. These beads can be slid along the ribbon.
Block 5: the block was a orange and yellow striped cotton where i laid 2 layers of a yellow crinoline sewed all around leaving an opening to insert some small beads inside. The next step was to couch on some yarn to form a spiral maze. The beads can be pushed around to get them all in the center or to the starting edge.


Block 8 & 9: I took a plastic ring and cut lengths of 1/2 yard yarn of various colors and folded them in half and pushed the fold into the ring and brought the ends back through the loop. then sewed the ring in place. I left the length of the yarn tassel long so that it can be braided. Under this the zebra fabric is a minky.
block 10: Found a arodesent crunchy and twisted it to make an 8 shape and sewed a button in the center to secure it. Also added extra buttons for visual ballance. The block is a sateen fabric.


Block 11: This is using a cotton and i added a strip of velcro sewn to the tab and attached at the top on the edge. The tab was made by cutting a 2 and half inch strip. I sewed the velcro on half and folded right sides together leaving the opening for flipping. Once flipped i sewed the ribbon to secure the 2 layers together and sewed the open edge to the block.


Block 12: Ribbon Flower, I made a 3″ circle of cotton and sewed the folded tabs of different textured ribbon to the right side of the circle and flipped the tabs. then sewed the circle onto the velour blue fabric. I left the top open to stuff some batting inside to give the center height and finished sewing the circle.. a button was added after to add visual element.
Block 13: This is purple fun fir with buttons threaded on a lace ribbon and sewed on the edges. the pieces of ribbon go over under. The buttons can be slid along the ribbon.


Block 14: Zipper on cotton with pocket. For the bocket i folded a 6″ square and sewed the zipper onto that then sewed that piece on the block. If I was to do this again idd add a piece on each side so that it was a full pocket not just half. A ribbon tab was added for easier pulling of the zipper tab.


Block 15: This block was made with fireside. I made a pocket using the same fabric and adding the rainbow ribbon for visual accent. a ribbon is sewn on the doll tab and into the pocket so she wont get seperated. then the edges of the pocket are sewn to the square.


Block 16: Folded flower on ryon block. I got the instructions for this flower at this bog Kadbury is thinking our loud I added the yellow button at the center to finish it off.
Block 17: Ribbons on a velvet block. i just sewed the edges of the ribbons on the edge of the block. left the center loose so fingers can be tucked under/


Block 18: This square is made from a car wash mitt or floor mop material i just cut the 6″ square.. My advise is you cut off the edges of the mubs to reduce bulk and sew the edges easier.
Block 19:Cloud flannel square with pompom ribbon sewn diagonally. these are secured to the block.


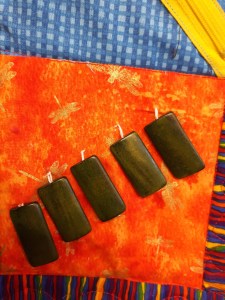
Block 20: this block had metallic dragon flies and the wooden flat beads are sewn on with floss 2x thru the beads for strength.
I added a 2″ border of a bright striped fabric. the quilted it in the seam of each block.
I hope this will encourage you to make one for a loved one that has dementia or alzheimer’s. I really enjoyed making this with mom to give to her sister. Open your imagination as the sky’s the limit when making these.. i would have been so easy to keep making blocks but i wanted this to fit on her lap so stopped at 4×5 block layout. it finished 22″x31″

Thank you….this has been on my “to do” list for too long.
LikeLike
your very welcome.. hope whoever gets yours enjoys it.
LikeLike
This is the best tutorial I have ever seen for making fidget quilts…thank you…
LikeLike
your very welcome.
LikeLike