Wow cant believe how time flies. It seems that it was not that long ago that I signed up for this RAL by with Marin at seams to be sew. I think it was around March. Normally i would have had this block finished way ahead of schedule.. This year with the whole COVID mess, and taking care of my family at home i have not felt like doing much sewing… procrastinating is not my thing but i did it this year.. It is now October 6 and I’m to release my block on October 8th.. ..
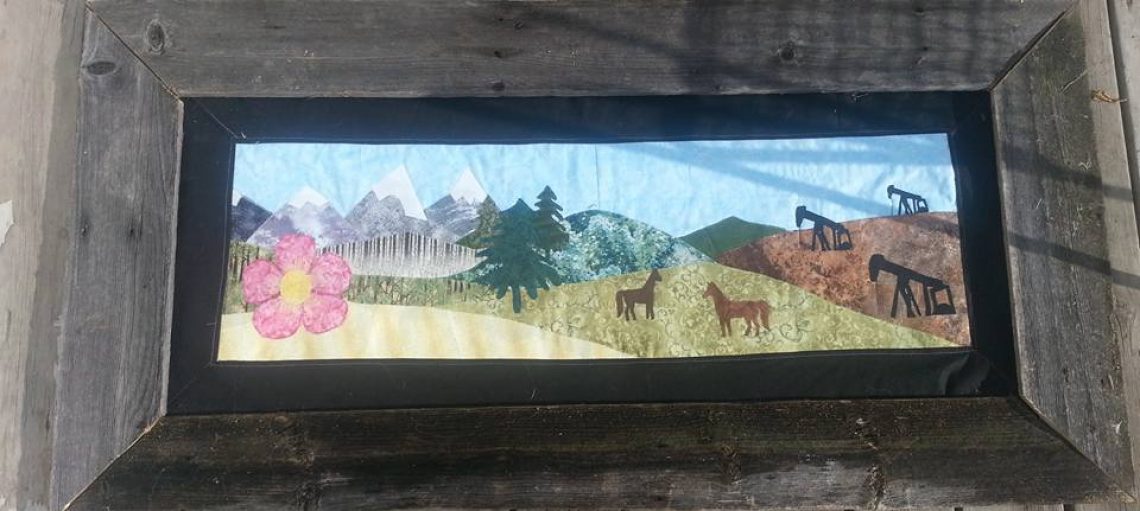
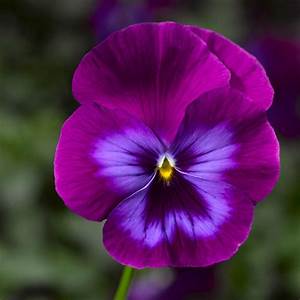
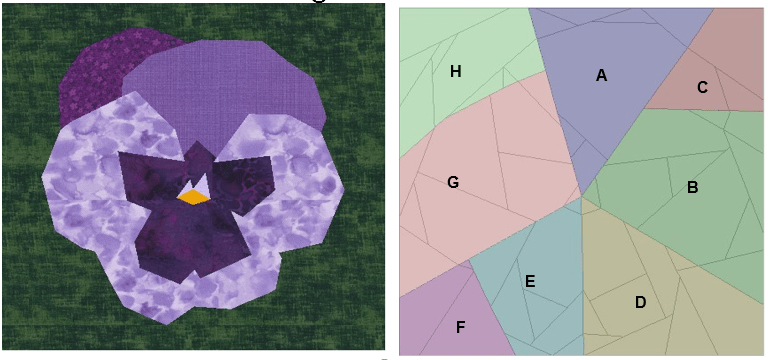
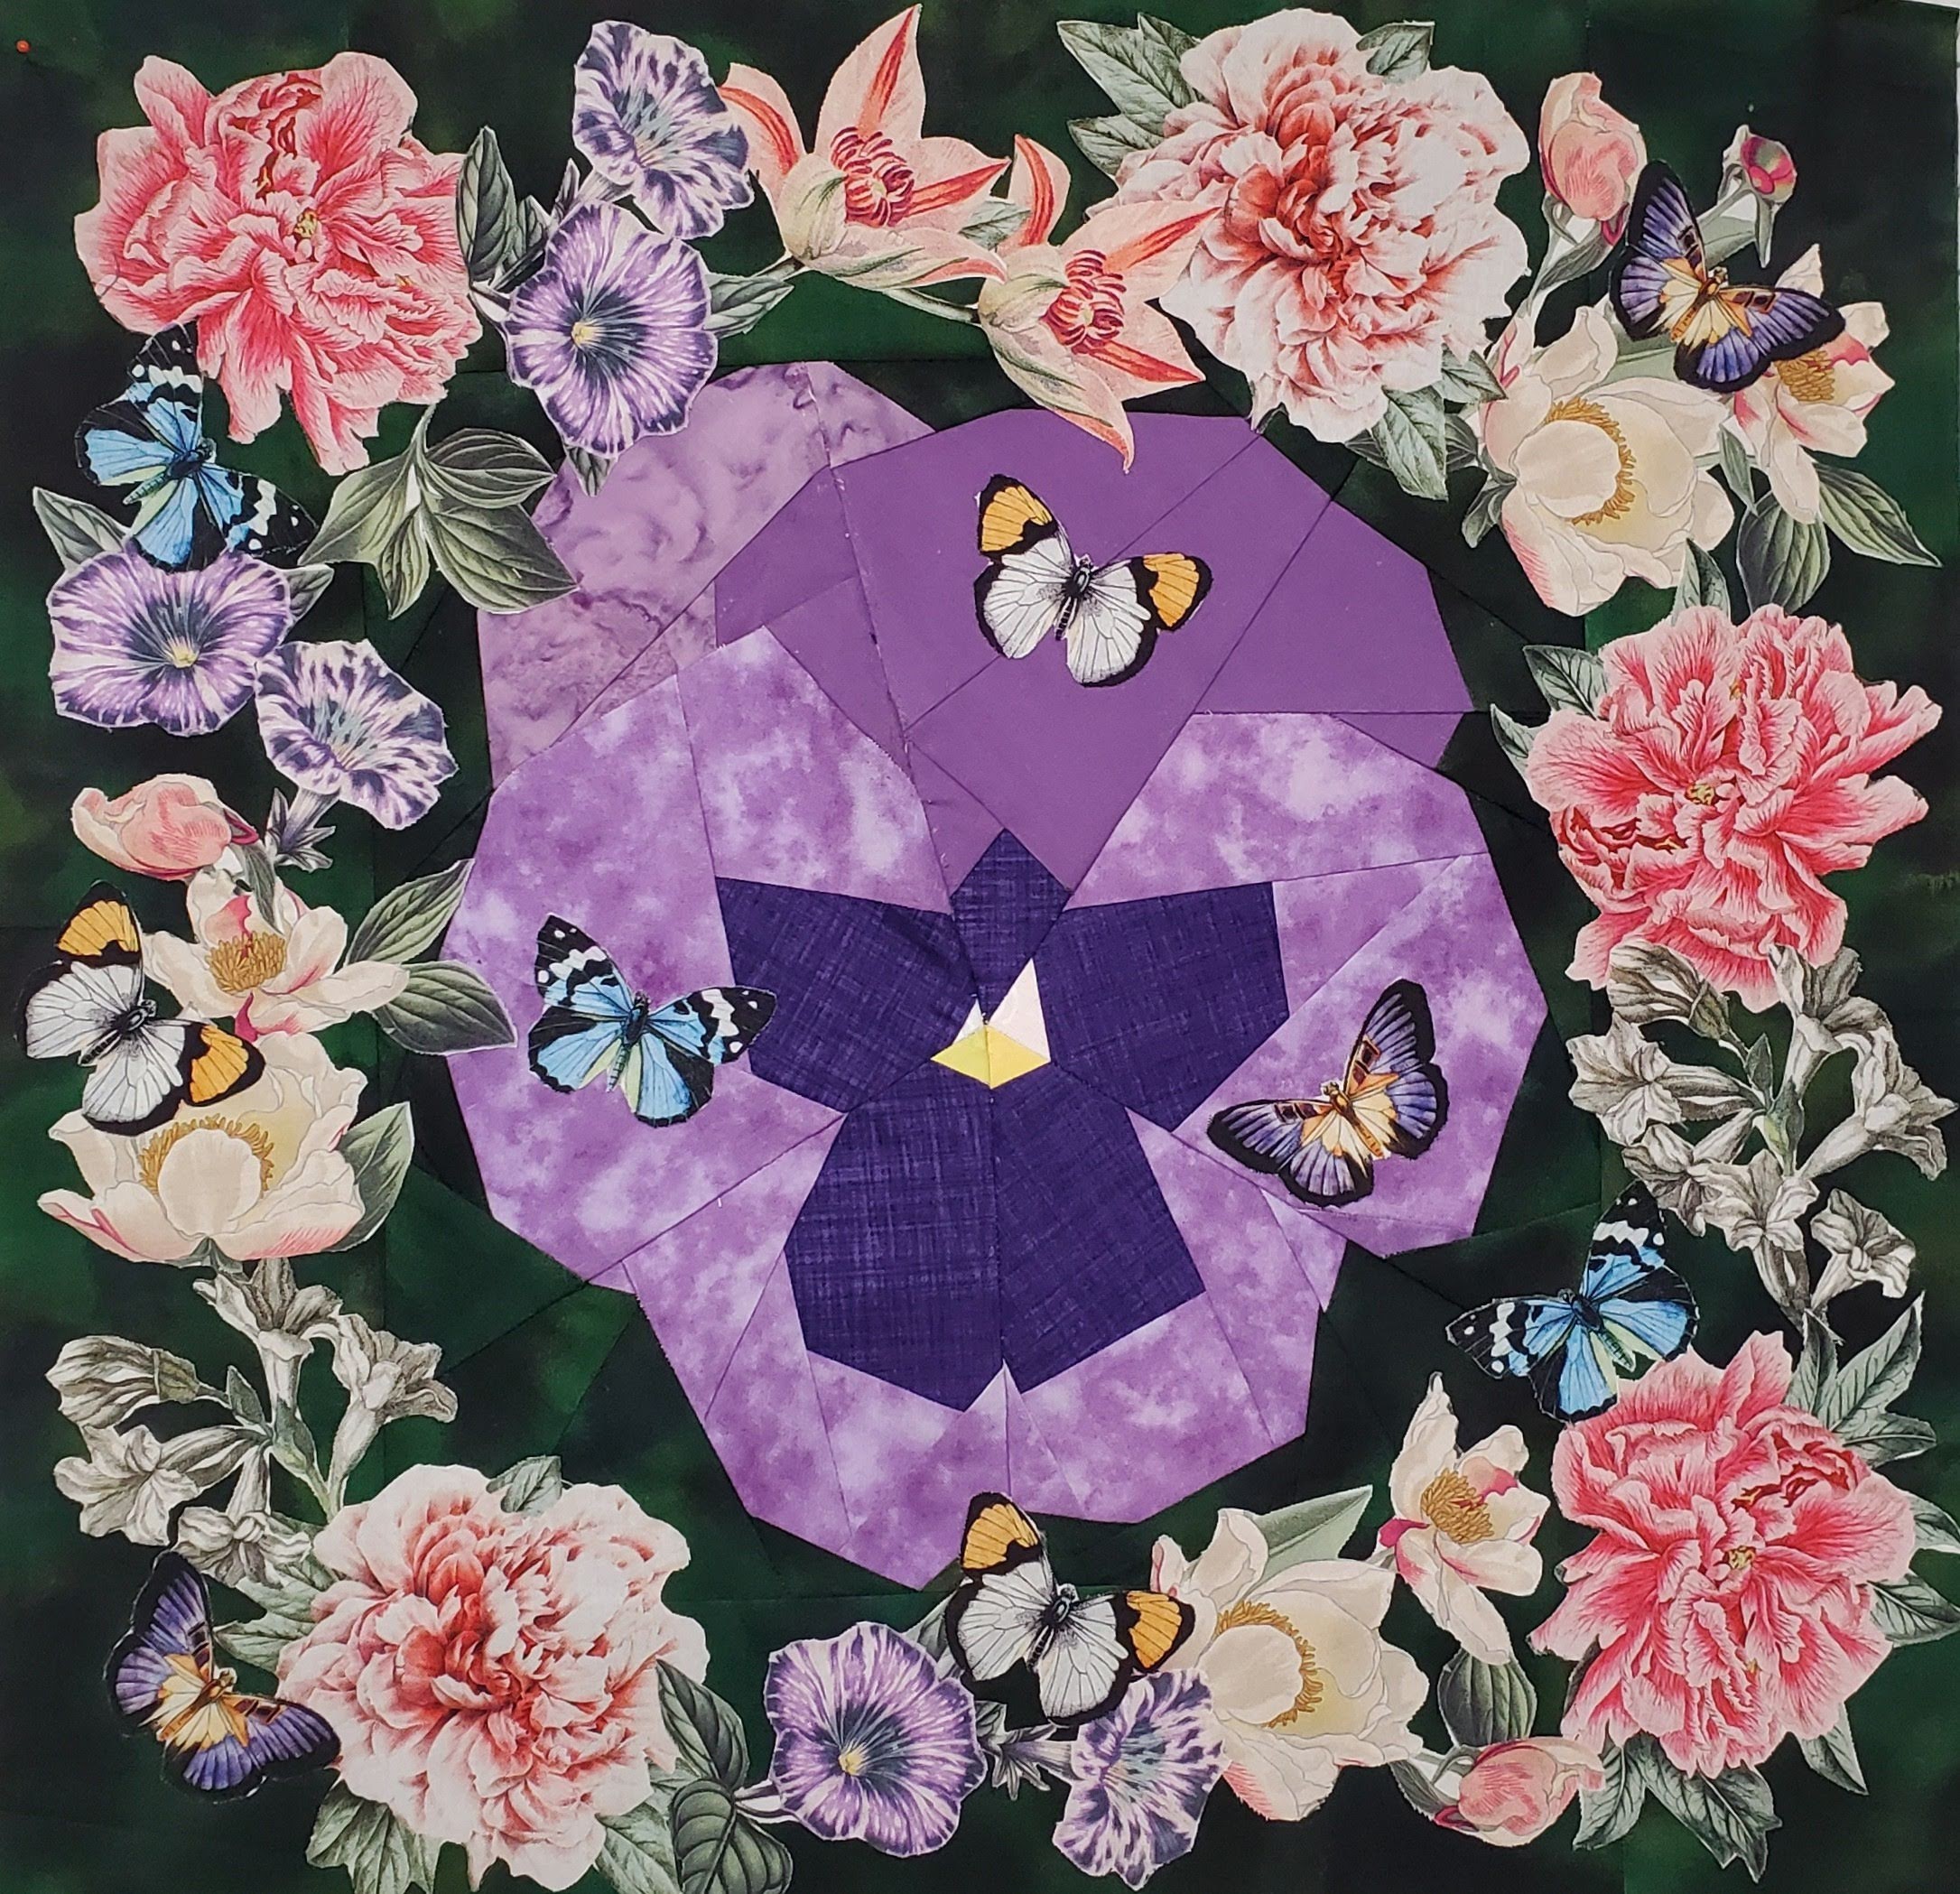
I decided to sway from the horse theme this year as i wanted to teach myself how to do a paper pieced project on my EQ8 program… so i choose to do i violet or pansy flower. This is the photo i choose i think. lol i was not saved so I’m not sure but it look correct.
pansyElectric Quilt (https://www.electricquilt.com) is offering a 20% discount code off any products except for EQ Academy during the row along. The coupon code is: GARDENPARTY20.
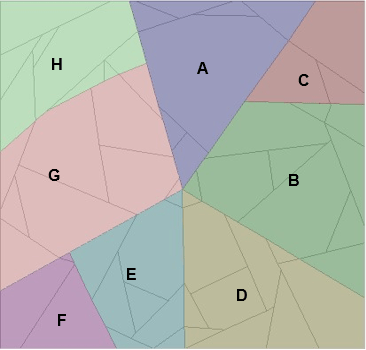
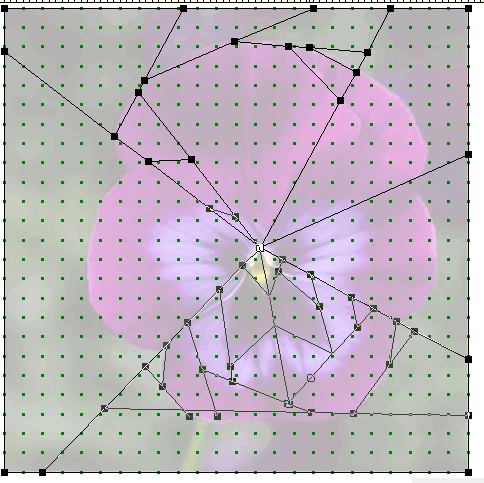
Using my Electric quilt program EQ8. The first thing i had to do was figure out how to separate the flower into sections then i could sub divide them to get in the detail. the photo below is reversed.
sections divided and sub divided.
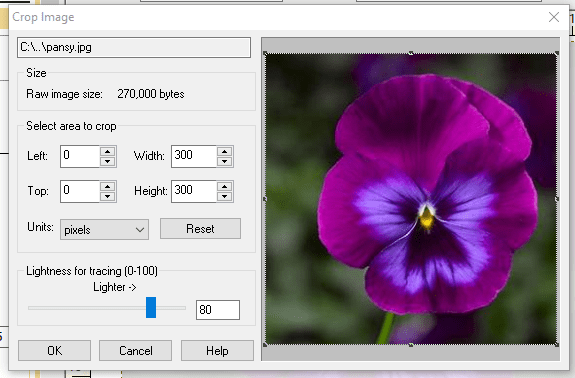
How did i do this? you may ask. well i’ll try my best to explain it for you. I designed this block in the easy draw portion of the block worktable of the program. Under the draw heading to Import image-choose the photo from the your files i saved in pictures, then open
next is where you can edit your photo and then i like to lighten(around 60-80) the photo so i can see my lines better as i draw hit ok.
now once you have imported your photo you adjust the size of the block height and width (18×18) snapping options to snap to lines of drawing, now draw your sections i started from center and worked my way around to divide the petals into sections. to check if my sections are not open i color them just to see if they will bleed into an other section.
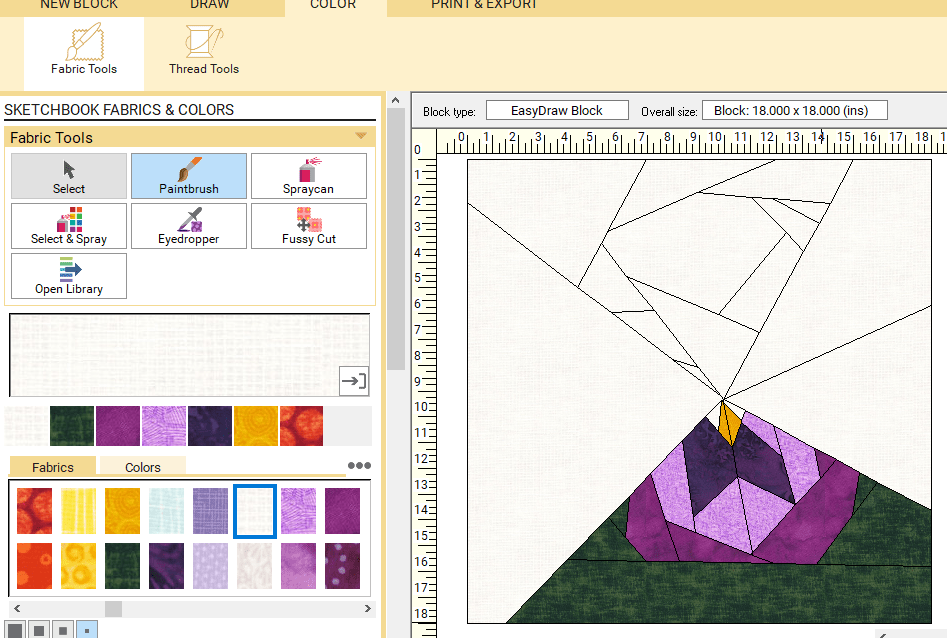
now i will sub divide the sections in the same manner that i did the above step.
Once i have the full flower sectioned off. I go to the color screen and start filling in the sections with colors. this you may need to bounce between the draw and color tab to get your colors in the correct sections. Ive done a potion of this for you to see.
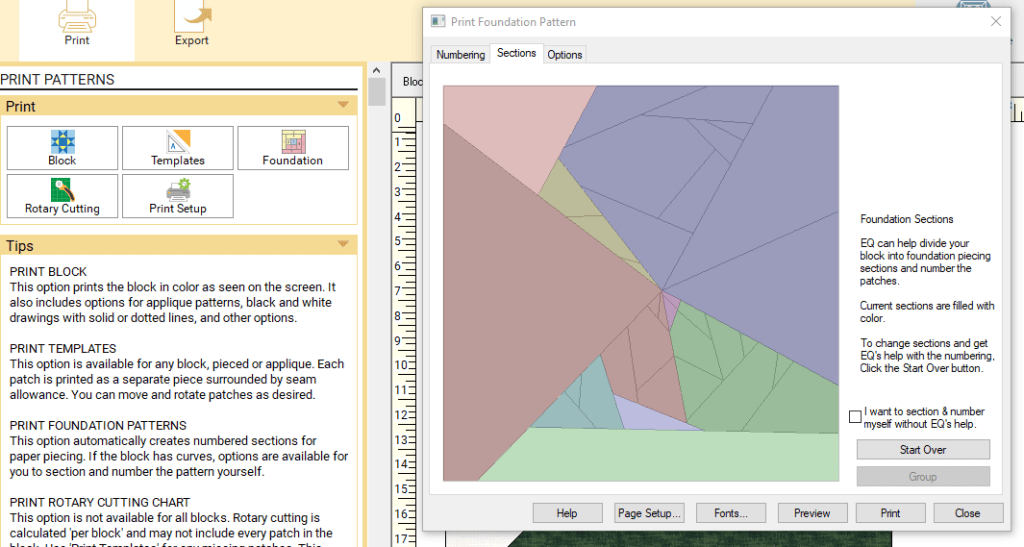
When the full block is colored then you can go to the print tab and choose foundation and the program will automatically do it up for you or your can choose to section them yourself by clicking the i want to section and number myself box. for this tutorial ill leave it.
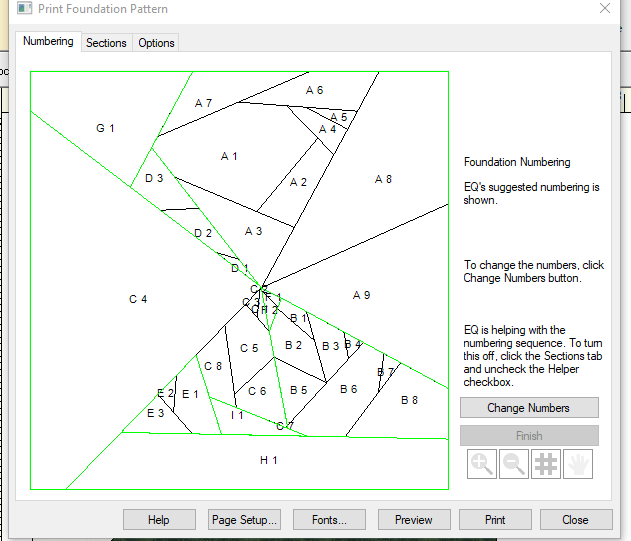
this is what the number tab would look like again you can choose to number them yourself.
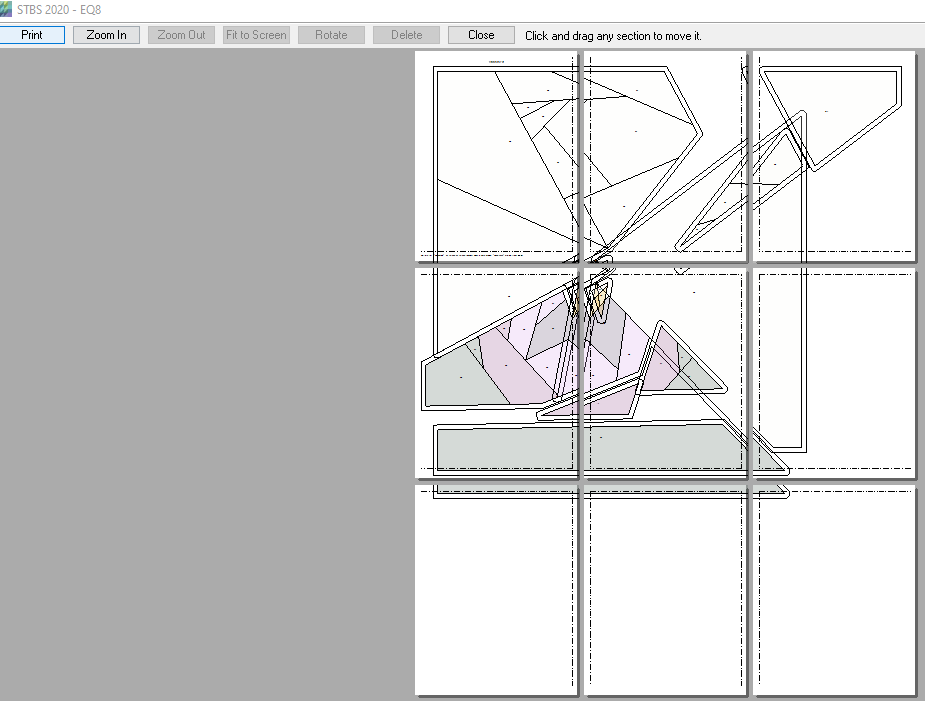
Once the sections are like you want them i like to hit the print preview to see how it will print.. you can adjust the sections so that they are not so close together. this is how they would print you can see alot of over lap. by clicking a section you can drag it to an other location.
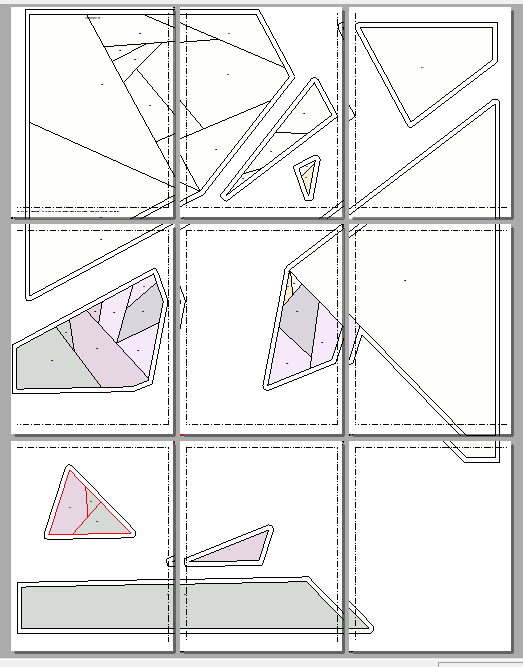
Here they are spaced out.
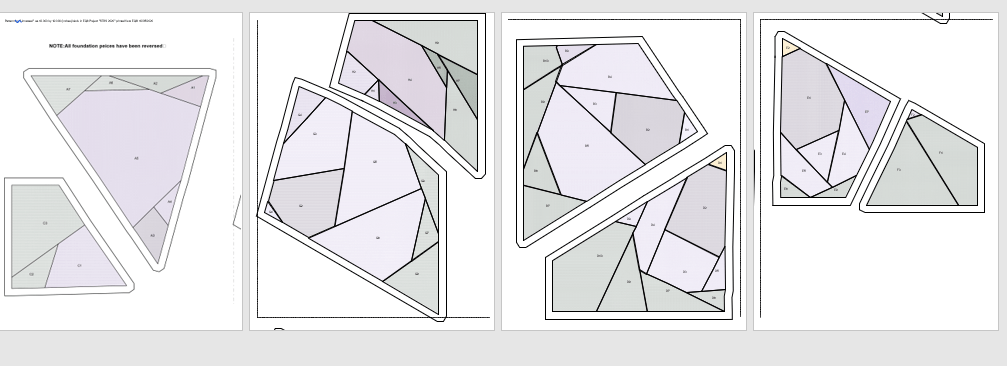
now it just a matter of printing your project. they do print reversed to the image that you choose. this is from the pattern that i have done up for you it will do a 12 inch block.
here is what the peices will look like in the pattern.
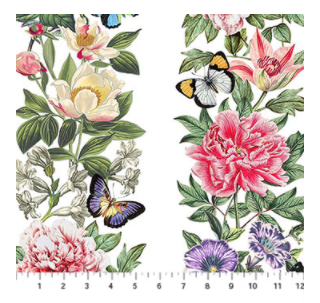
Northcott fabrics was kind enough to send us each a yard of fabric for this project and i choose a border print from the Botanica – Single Colorway By Michel Design Works.
I choose to collage the outer border of my block by ironing on a fusible web on 2 of the meter border strips like seam2seam. Then I cut out the flowers away from the background and arranged the flowers around my main violet. I also took a few butterflies and added them to the violet. I really like how it turned out..
As each year there have been many bloggers joining the sew along. Even thought this is the last day you can look back on the past post to see what others did with the garden party theme, here is the schedule:
Northcott donated a fat quarter bundle for my draw winners.
Shipping Is Shipping Anywhere – USA winners will wait until the Row Along ends for shipping to take place and USA winners will pay shipping costs. Value $15.00
I live by Mayerthorpe, Alberta Canada.A mother of 3. In my spare time I have 2 loves: Quilting and my horses these work well with the seasons. I started quilting when my oldest daughter was born 25+ years ago. I was making western shirts, when I quilt making those I had lots of bright cotton so I started making quilts. Over the last 17 years I have really gotten into it. I started taking an applique and a free motion class at my LQS. I'm now at the point where I no longer purchase Patterns. I've actually started designing my own. In 2015 I invested in EQ7 Quilt design program. In 2013 I purchased a HQ Sixteen on a 12 foot frame, then April 2023 I upgraded to a Gammill Stetler 22 inch.
View all posts by Renee Chester's Quilting Addiction
38 Comments
A pretty pansy and thanks for showing how you designed it.
Thank you for the pansy pattern. Each spring my grandmother would plant pansies in the flowerbed at the base of the steps to her front door.. When I see purple pansies, I think of her.
this is such a cool process to get to the final result. wow. thank you for sharing your violet with us. my grandmother had a full violet garden with many varieties. she offered to give me some. she forgot to tell me they tend to take over. LOL 10 years later I am still pulling out stragglers But they remind me of her so it is all good
Wow, thanks for sharing your beautiful block and your process. I have only done small pp blocks in EQ, but you really took it to the next level! And it’s terrific!
This is such a pretty flower! I look forward to visiting garden centers to find this flower for spring time planting here in Iowa, USA. Thank you for sharing.
Wow; looks kind of complex for my skill level, but I hope to get there some day. It is a lovely idea, and it was interesting how you figured it all out.
You pansy is very pretty! I love pansies!! I’m not much of an FPP person, but I have foundation papers and our guild president taught a class last year, so this is on my to do list! Love how you collaged the flowers and butterflies. Great idea! Thanks.
You made a really lovely pansy block that I will love experimenting with. It has been a hard year so I appreciate the effort it took to finish this. Thank you and thanks to the lovely sponsors.
A Wonderful pansy. The border fabric and how it was used to frame the pansy looks to be a wonderful way to use the design as a pillow. Thank you for showcasing that use.


A pretty pansy and thanks for showing how you designed it.
LikeLiked by 1 person
Your flower block is amazing, and it was really interesting to see the design process!
LikeLiked by 1 person
Thank you for the pansy pattern. Each spring my grandmother would plant pansies in the flowerbed at the base of the steps to her front door.. When I see purple pansies, I think of her.
LikeLiked by 1 person
Thank you for the pattern and for showing us how you made it, very interesting.
LikeLiked by 1 person
This is beautiful! As a relatively new EQ8 user, I greatly appreciated the tutorial too!
LikeLiked by 1 person
I love violets! Thank you for the pattern.
LikeLiked by 1 person
Your row is amazing. Beautiful!!
LikeLike
What a pretty block. Hope I can do it!
LikeLike
Thank you for the beautiful pattern you shared as well as the tutorial. I’m very new to EQ, so it was very helpful.
LikeLike
Beautiful flower! Thank you for the explanation on designing it.
LikeLike
this is such a cool process to get to the final result. wow. thank you for sharing your violet with us. my grandmother had a full violet garden with many varieties. she offered to give me some. she forgot to tell me they tend to take over. LOL 10 years later I am still pulling out stragglers But they remind me of her so it is all good
LikeLike
Love the pansy! Great process description, now to see if I can stitch it. Thanks for sharing your inspiration & creativity both with EQ & in fabrics.
LikeLike
I love your pansy. Thanks so much for sharing
LikeLike
What a pretty flower, I enjoyed seeing the design process.
LikeLike
Love Pansies. Thanks for the tutorial on how to make these type of blocks.
LikeLike
Wow, thanks for sharing your beautiful block and your process. I have only done small pp blocks in EQ, but you really took it to the next level! And it’s terrific!
LikeLike
Love pansys! Thanks for sharing.
LikeLike
This is such a pretty flower! I look forward to visiting garden centers to find this flower for spring time planting here in Iowa, USA. Thank you for sharing.
LikeLike
Your pansy is lovely! Thanks for sharing.
LikeLike
Wow; looks kind of complex for my skill level, but I hope to get there some day. It is a lovely idea, and it was interesting how you figured it all out.
LikeLike
I have always loved the pansy. Thanks for the design.
LikeLike
Thank you for the great EQ8 tutorial re making this flower. I have learned something new. 🙂
LikeLike
Wow!!! Was interesting to see how your pansy was designed!! You’re sooooo creative! Thank you for sharing…& for chance to win your Give-a-way too 🙂
LikeLike
Very pretty, thanks for the great pattern!
LikeLike
Thanks for the design & tutorial
LikeLike
I love the pattern. Maybe I need EQ 8 after all.
LikeLike
You pansy is very pretty! I love pansies!! I’m not much of an FPP person, but I have foundation papers and our guild president taught a class last year, so this is on my to do list! Love how you collaged the flowers and butterflies. Great idea! Thanks.
LikeLike
Thank you for the beautiful pansy
LikeLike
I love your pansy! So pretty, and I love the way it’s constructed. Thanks!
LikeLike
You made a really lovely pansy block that I will love experimenting with. It has been a hard year so I appreciate the effort it took to finish this. Thank you and thanks to the lovely sponsors.
LikeLike
That’s a pretty pansy. I loved the collaged border.
LikeLike
Pansies were my mom’s favorite flower. Yours is beautiful.
LikeLike
A Wonderful pansy. The border fabric and how it was used to frame the pansy looks to be a wonderful way to use the design as a pillow. Thank you for showcasing that use.
LikeLiked by 1 person
Very Pretty! thanks so much
LikeLiked by 1 person
WhaT a beautiful block Renee. Thanks for sharing with all of us. I love the way you did the flower border and so appreciate the EQ tutorial.
LikeLiked by 1 person
Nice addition to anyone’s garden. Pansey’s are so pretty. Thanks for a wonderful pattern.
LikeLiked by 1 person
That looks great with the Broderie perse flower borders! Wonderful blend of old and new. Thank you!
LikeLiked by 1 person