

My release day has finally arrived……
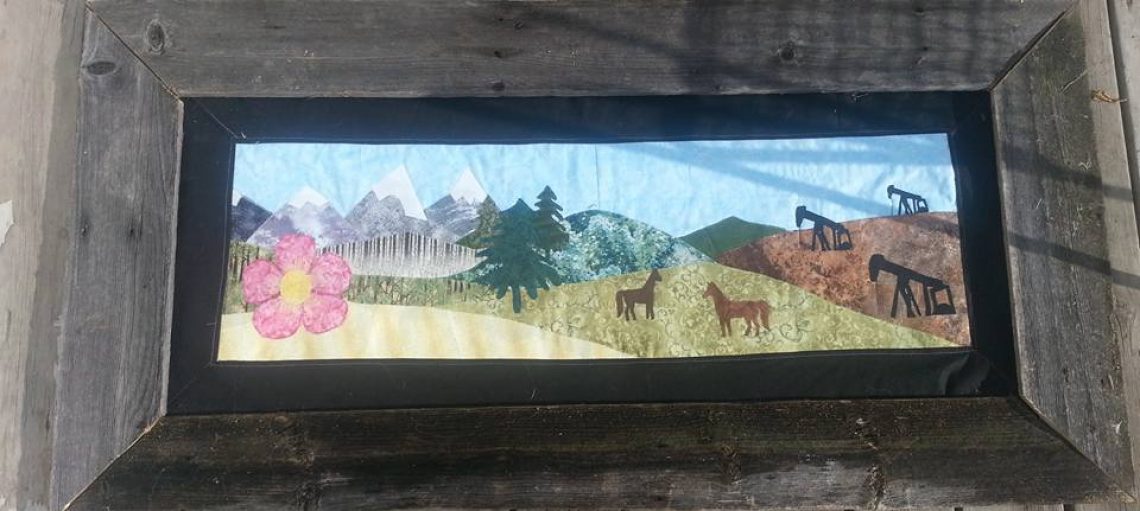
Here she is my Alberta Canada Block.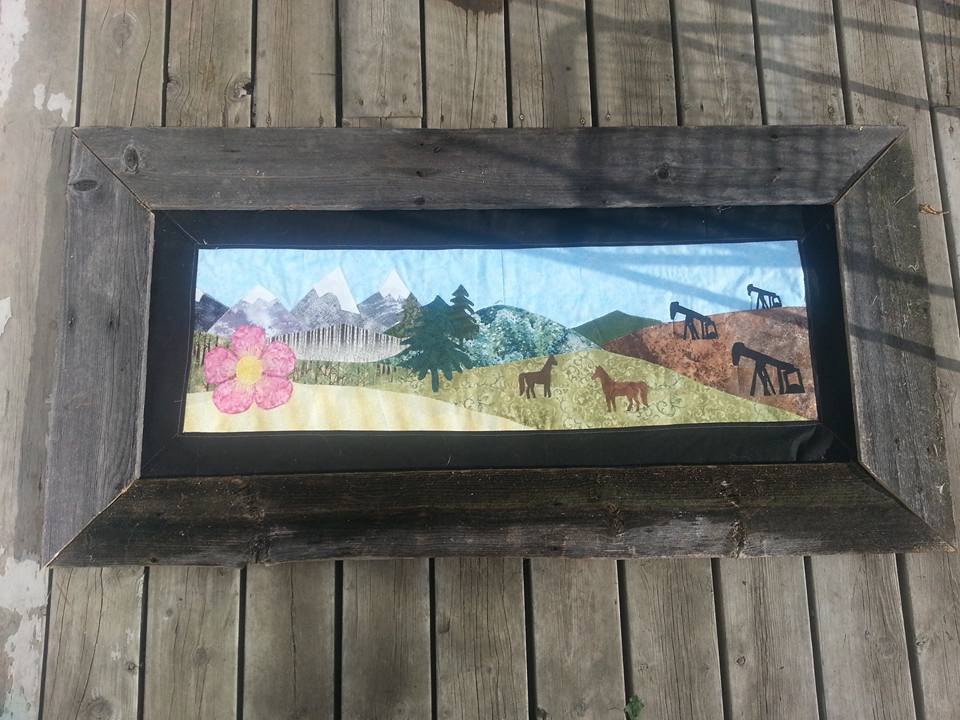
Before we begin Id lake to give a big THANK YOU to Marian of Seams to be Sew and Amy at Sew Incredibly Crazy without them we would not be able to have this blog hop with all these giveaways. Thanks Girls for all the work you put into organizing this event the 2016 Road Home Row Along.
I’ll try my best to explain my design process and the steps I made to get to this finished block.
First of there was size specifications that our blocks had to be. I designed mine on EQ7. The size of my block when finished without borders is 12″ x 40″. I choose to do a landscape layout as I was planning on doing a landscape of Alberta Canada.
Elements that to me represent Alberta are:


- mountains- I only live an hours drive from seeing the peeks of the majestic Rockie Mountains,
- foot hills- can’t get to the mountains without crossing them,
- evergreen trees living in northern Alberta the are abundant and I have pine trees in my yard ,
- pump jacks are found in the field next to my house,
- fields of grain and summer fallow I live in an agricultural community,
- pastures for horse I have 6 of these in my yard,
- wild rose is the Alberta Provincial flower and they grow wild in the ditches along my driveway
- cloudy skies. Only in Alberta can we get all 4 seasons in one day.
The next step was how to lay them out. Of course the mountains had to be in the West. then as we head east we would come to the foot hills then fields. This was all done using layers of applique.
Now that I had my basic idea what I wanted in my row off to my EQ7 program to design it. This turned out to be also more confusing as I was just learning the program…did I mention I like to challenge myself. I tried drawing the mountains and for some reason they kept erasing when I wanted to go color them. Turns out that all your shapes need to be closed if you want to color them in. Thanks to the help from Marian of Seam to be Sew we got that portion figured out. The rest went well as I knew what I was now doing. With the landscape done I could move on to adding the shapes.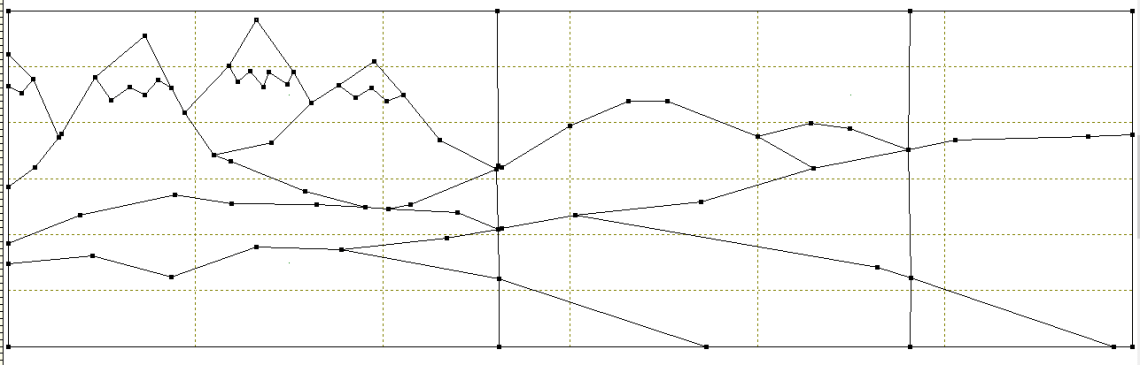
My next step was to do the shapes for the pump jacks, horse, pine trees, and rose. this I had to do into my applique section of the EQ program. I found the pump jacks to be quite challenging again my shapes were not closed. The pine trees were an afterthought so they were added into the design later in the process.


She was coming together. now all I had to do was copy paste and resize the elements. and color them in.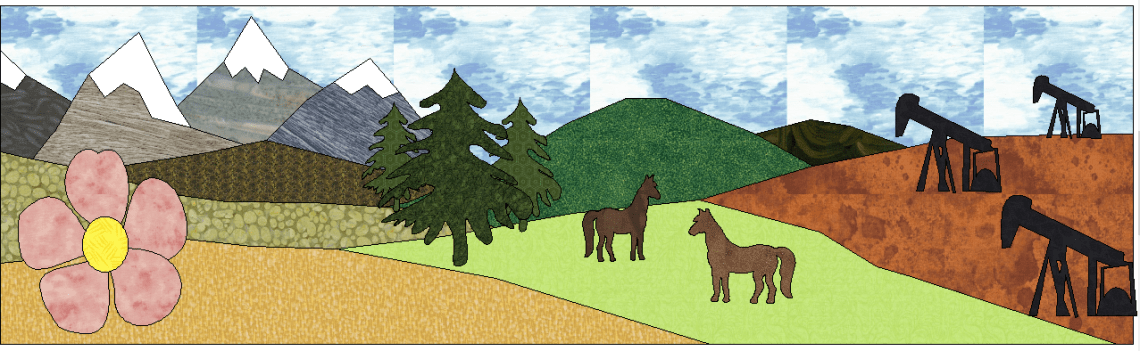
Whoop hoop…. I was finished the block design. now all I had to do was print it out and start assembling it. Again this sounded easy but when I first started for some reason the block size was not set to what I wanted and my mountains when I cut out the fabric were all squished as i was working with a 12×20 block not 12×40 block. And I had forgotten to reverse my templates. 
Assembly of my block went as follows:(I’m going to make an other one just to show you all the steps in photos as I got way ahead of myself and was done before I knew that I had to do a detailed description.)
- I sewed the sky fabric to the bottom what ever scrap I had on hand to make a foundation to mount the rest of the elements on.
- Traced out all the shapes that was needed onto fusible web I like to use Heat n Bond.
- Starting with the mountains that were in the rear and then assembling towards the front. I layered and pinned everything into place and then ironed it town to get the heat n bond to stick.
- Same thing was done with the foreground shapes.
- then all I had to do was run a satin stitch around all of my shapes.
My Free pattern can be found:
The Road Home RAL: Alberta Canada
I hope you enjoy and please show off your finished project.
Don’t forget to check out the rest of the blocks offered free to all in this blog hop .
the-road-home-row-along-schedule
Allie oopps

These are the blogs being released.debuted this week. Go to the schedule for links.
Giveaways for dropping by…
I’m having issues with the Giveaways please go to the Seams to be Sew Blog to Enter.
Washington Street Fabrics 1 Bundle – Fats, Strips, Squares / Requirements: US Enterants Only


Anita Goodesign Machine Embroidery Design CD


Very cool row. You can tell you puta lot of time into it. Thanks so much!
LikeLike
No thank you and enjoy
LikeLike
Oooh! Horses! I love it! Thanks for the giveaway opportunity!
LikeLike
no problem. I love horses too.
LikeLike
Very nice row, love the horses. Thanks!
LikeLike
thanks . I could not see a scenery withought horse. its going to hang in my sons western themed room
LikeLike
Thank you, Renee, for the pattern to your row. I’m glad you explained about working from the back to the front. Raw-edged applique by fusing is an excellent idea. I’m sure, with practice, you’ll get better and better with EQ.
LikeLike
Thanks. I’m having so much fun with eq
LikeLike
It’s fun trying to guess the locations by looking at the different rows. You did a wonderful job on yours.
LikeLike
Thank you. I suppose it could be anywhere along the rocky mountains in the us also.
LikeLike
A beautiful row! It reminds me of my own love of the intermountain west. Thank you for your design.
LikeLike
where are the intermountain west? Thank
you
LikeLike
Wonderful Row, thanks so much.
LikeLike
Your Quite Welcome 🙂
LikeLike
Very nice Road Home quilt a long. I have horses and live in the country too!!
LikeLike
So this should suit our tastes then. lol see our pastimes quilting in winter and horses in summer work perfectly with the seasons
LikeLike
Your row is beautiful! Love it!
LikeLike
thank you ariane.
LikeLike
Great row, Renee! I live in the mountains, so I’m partial to those pine trees! I love the wild roses, too!
LikeLike
thanks Laura,
LikeLiked by 1 person
First time entering a “blog”. And a quilting blog seems to fit me perfectly. Can’t wait to continue and not knowing how. Watch me me jpgb….
LikeLike
this was my 1st time I joined the road home row along before I even had a blog. lol so we are all on learning curves.
LikeLike
Very pretty row, I like how you showed photos of it all coming together!
LikeLike
Thank you
LikeLike
All I saw was the pattern at the beginning of this post and my first thought was “Gee that really looks like Alberta.” And then I scrolled down to find that I was indeed correct in my assumption.
Too bad all the giveaways are for US residents only.
LikeLike
I Know the lady who hosts it is from Italy and she cant participate. I think the reasoning is that the sponsors don’t want to ship out of country.
LikeLike
We’ve been to several parts of Canada and love them all! The people and scenery are the best!
LikeLike
Thank you Kathy I’m proud to be Canadian. seems to me we are all friendly and the wide open spaces not cluttered by citys.
LikeLike
This reminds me of Montana. I have been up in Alberta, it is a very lovely place.
LikeLike
how difereint is montana then alberta are the mountains as high?
LikeLike
You put a lot of work into this beautiful row!
LikeLike
It really was not that much. fabric selection was the hardest.
LikeLike
Thank you for your tutorial. Love your row!
LikeLike
your welcome Nicole
LikeLike
Beautiful row. You put so much detail into it.
LikeLike
Thank you aimee
LikeLike
What a beautiful place to live; you captured it in your row! Well done.
LikeLike
Thank you I do consider alberta one of the nicest provinces in canada
LikeLike
So great to see an Alberta entry!
LikeLike
thank you . you must be an Albertan too
LikeLike
I love your row and will share this post with my Row by Row Experience friends. crystalbluern at tds dot net
LikeLike
Thank you Debra I appreciate it.
LikeLike
My favorite row for today. I love mountains, trees and horses.
LikeLike
Thank you Susan.
LikeLike
I like that we can learn about all these places and collect all these rows without the need to travel!
LikeLike
yep or stepping into a quilt shop to get the patterns. lol
LikeLike
Thank you for a beautiful row! I’ve been to Canada and out west and I didn’t know how to express it, you did it for me. Love it.
LikeLike
Thank you is sure is memorable isn’t it.
LikeLike
Beautiful Work!
LikeLiked by 1 person
thanks debbie
LikeLike
Love the mountains in your row!
LikeLike
Thank you the material I chose sure made them look realistic.
LikeLike
Thank you, Renee, for sharing your beautiful row and your design process. I also love your rocking horse baby quilt … 🙂 Pat
LikeLike
thank you pat.
LikeLike
Love your row. So glad that you joined us on this hop.
LikeLike
Thank you amy
LikeLike
I love your row. The oil wells and hills remind me of Oklahoma and the mountains….Colorado. Wonderful row!
LikeLike
Thanks ive only traveld to Washington and Michigan
LikeLiked by 1 person
Beautiful Row!! Very creative & details are Awesome!
LikeLike
Thanks Lori
LikeLike
Beautiful row!
LikeLike
Thanks peggy
LikeLike
Thank you for sharing HOW you designed your awesome block, I’m new to EQ7 so this was super informative.
LikeLike
your quite welcome. I really enjoy sharing what ive learned. the way I see it someone tought me now its my turn.
LikeLike
Love it
LikeLike
thanks
LikeLike
I love love your block
LikeLike
thanks Maggie hope you enjoy it.
LikeLike
I really like that you listed the steps you used to assemble your block. Your “home” looks like a lovely place!
LikeLike
thanks. I’m glad you enjoued it.
LikeLike
Thanks for the great row! I live in Calgary, so I’ll be making this one for sure.
LikeLike
Thank you. I hope you have fun making it.
LikeLike
Looove your Row!! Great detail & know lots of work! Great job!! Have never been to Canada…on my Bucket List tho! 🙂
LikeLike
lorry you wll really enjoy it we have wide open spaces and beautiful scenery
LikeLike
What beautiful and meaningful art! Thanks so much for the detailed explanation of how you put your row together. This is inspiring me to try a block like this.
LikeLike
thank you. hope you enjoy making if if you do.
LikeLike
I love your row. Thanks for sharing.
LikeLike
your welcome
LikeLike
Very nice row. I love the applique.
LikeLike
thank your monica
LikeLike
Love your row & theis Hop is being such fun…so many ideas shared! Thank you for chance to win the great Give-a-way too! 😀
LikeLike
Thanks and your welcome. the giveaways were marian from Seams to sews doing.
LikeLike
I love your row, it really depicts your part of our beautiful country. Well done.
LikeLike
thanks Rhonda. your totally correct I do feel like I live in a beautiful part of Canada.
LikeLike
your row is so beautiful. I shared it.
LikeLike